Unoffical empeg BBS

Quick Links: Empeg FAQ | RioCar.Org | Hijack | BigDisk Builder | jEmplode | emphatic
Repairs: Repairs

Page 1 of 2 1 2 >
Topic Options
#99051 - 12/06/2002 15:25 Temp controlled fan installation finished
f_devocht
member

Registered: 28/12/2001
Posts: 159
Loc: Belgium
I just finished the install of a temperature controlled fan. The result is quite good. More info about it here: http://users.pandora.be/miata/english/empeg_fan_installation.htm

Frank

Top
#99052 - 12/06/2002 15:30 Re: Temp controlled fan installation finished [Re: f_devocht]
robricc
carpal tunnel

Registered: 30/10/2000
Posts: 4931
Loc: New Jersey, USA
That is killer! Great looking job!
_________________________
-Rob Riccardelli
80GB 16MB MK2 090000736

Top
#99053 - 12/06/2002 15:48 Re: Temp controlled fan installation finished [Re: f_devocht]
tfabris
carpal tunnel

Registered: 20/12/1999
Posts: 31565
Loc: Seattle, WA
A very decent page, a very nice project. I'm going to link that one from the FAQ. Will the URL remain constant for a reasonable amount of time?

One thing: On your page, you state, "There's an unused cutout for a switch on the back corner (marked security) so I didn't have to cut any holes." Actually, this hole is not for a switch. Click here for an explanation of the purpose of the security slot.
_________________________
Tony Fabris

Top
#99054 - 12/06/2002 15:50 Re: Temp controlled fan installation finished [Re: f_devocht]
tfabris
carpal tunnel

Registered: 20/12/1999
Posts: 31565
Loc: Seattle, WA
May I also suggest detailing in the text where the fan gets its power from? And whether or not you've noticed if there is any extra electronic noise on the outputs induced by the fan?
_________________________
Tony Fabris

Top
#99055 - 12/06/2002 15:56 Re: Temp controlled fan installation finished [Re: f_devocht]
tfabris
carpal tunnel

Registered: 20/12/1999
Posts: 31565
Loc: Seattle, WA
Ooo, it would also be cool if you could list the sources for the components, too. For instance, Ratshack/Jameco part numbers or whatever.
_________________________
Tony Fabris

Top
#99056 - 12/06/2002 16:14 Re: Temp controlled fan installation finished [Re: f_devocht]
AndrewT
old hand

Registered: 16/02/2002
Posts: 867
Loc: Oxford, UK
That's very nice indeed.
It would be cool (pun intended) if someone offered this in kit form, pre-soldered and heatshrinked etc. ready-to-go

The icing on the cake would be some way for Hijack to take control of the threshold setting (via an unused internal DAC channel within the Empeg?) so it could be controlled via the front panel.

Top
#99057 - 12/06/2002 16:25 Re: Temp controlled fan installation finished [Re: tfabris]
f_devocht
member

Registered: 28/12/2001
Posts: 159
Loc: Belgium
Yes, that page is supposed to remain constant.
Thanks about the security slot, didn't know about it ...
I don't know any part numbers as I bought these in a local shop. They're very common parts though (although the thermistor usually doesn't look like that).
I added a few more details to the page.

Frank

Top
#99058 - 12/06/2002 16:28 Re: Temp controlled fan installation finished [Re: f_devocht]
tfabris
carpal tunnel

Registered: 20/12/1999
Posts: 31565
Loc: Seattle, WA
Cool.
_________________________
Tony Fabris

Top
#99059 - 12/06/2002 19:22 Re: Temp controlled fan installation finished [Re: f_devocht]
johnmcd3
enthusiast

Registered: 19/04/2001
Posts: 369
Loc: Seattle, WA (formerly Houston,...
I think I may do the same sort of install except onto the outside of my sled. It would be easy to pull in cold air from the ac to pump into the unit due to the position of the ducts in my '98 M3. The sled-fan would line up with the empeg holes in the case, and I'd mount the thermister in the dash below/behind the empeg (away from cold air vent). I'll build the switch into my dash somewhere in case I ever use the heater.

John
_________________________
1998 BMW ///M3 30 GB Mk2a, Tuner, and 10 GB backup

Top
#99060 - 13/06/2002 04:53 Re: Temp controlled fan installation finished [Re: f_devocht]
mlord
carpal tunnel

Registered: 29/08/2000
Posts: 14478
Loc: Canada
Too CL!

Top
#99061 - 13/06/2002 10:16 Re: Temp controlled fan installation finished [Re: AndrewT]
f_devocht
member

Registered: 28/12/2001
Posts: 159
Loc: Belgium
Hah, somehow I knew this question would pop-up ...
I *could* make some, but the switch would be a problem. The switch required a bit of modification and was not very straightforward to fit.

Frank

Top
#99062 - 13/06/2002 10:38 Re: Temp controlled fan installation finished [Re: f_devocht]
smu
old hand

Registered: 30/07/2000
Posts: 879
Loc: Germany (Ruhrgebiet)
Hi.

Well, how about just supplying the switch unmodified? Either that or leave it out completely, so the user would have to get one that fits. Either way, I think finding a good (fitting) fan and doing the temperature control right is the most difficult thing to most people (besides finding a source for the parts).

Anyway: What exactly was the problem with the switch in its unmodified state and what did you do to fix it?

cu,
sven
_________________________
proud owner of MkII 40GB & MkIIa 60GB both lit by God and HiJacked by Lord

Top
#99063 - 13/06/2002 10:51 Re: Temp controlled fan installation finished [Re: f_devocht]
smu
old hand

Registered: 30/07/2000
Posts: 879
Loc: Germany (Ruhrgebiet)
Hi.

Another question: What modification to the temp/voltage control circuit is needed to make the output voltage lower (i.e. let the fan turn slower)?
The empeg is has a specified operating temp range that goes up to 55°C, so I would like to have a steeper curve on the voltage that starts later, which would probably mean I need a different thermistor. But even with the thermistor you used, it should be possible to have the fan stay off/inaudible up to at least 30°C or something.
Like in my stereo(home)setup, I know for sure the ambient temperature of the room will never exceed 26°C, but the empeg might get some heat from below, so that it goes up to 50°C while operating (well, after operating for more than an hour), so I would like the fan to still be silent at that temperature, because even a slow fan should be able to cool the empeg down quite a bit under these conditions. Others might have pretty high ambient temperatures, and thus need more airflow. a small poti to adjust the fan speed would be nice.

cu,
sven
_________________________
proud owner of MkII 40GB & MkIIa 60GB both lit by God and HiJacked by Lord

Top
#99064 - 13/06/2002 13:05 Re: Temp controlled fan installation finished [Re: smu]
genixia
Carpal Tunnel

Registered: 08/02/2002
Posts: 3411
Attached is a graph of Fan Voltage vs temp for various values of R2. My suggestion would be to replcae R2 with a 1k pot.

The graphs are theoretical, based on the formula for the regulator and the thermistor resistance/temp values that Franks had. Some errors are evident, but the graphs should be good enough to get you started. Some of them show voltages over 14 volts. Obviously this isnt really going to happen - they will level out at Vbattery minus some L200 specific value (2V ?? - I'm guessing here.)


Attachments
97742-image001.gif (186 downloads)

_________________________
Mk2a 60GB Blue. Serial 030102962 sig.mp3: File Format not Valid.

Top
#99065 - 13/06/2002 15:02 Re: Temp controlled fan installation finished [Re: smu]
f_devocht
member

Registered: 28/12/2001
Posts: 159
Loc: Belgium
The problem with the switch is that it was a bit too long to fit in the corner. I had to bend one of the mounting lips to a 90° angle. The mounting holes of the switches are very small and since I didn't have small enough bolts, I had to drill the holes out. Of course, the head of the bolt I used was too big, so I had to grind it down a bit etc etc ... Finally I only used one bolt and some silicone to keep it in place.

Finding the right fan is indeed not a simple thing to do. The specs of the fan I used are 0.6W, 5500RPM, 4.9CFM, 0.12in H2O, 26dBA.
Sunon also makes 6mm fans (but they're 5V only so you'd need to modify the circuit) and 8mm fans (but they're more noisy at 32.5dBA).
I wouldn't use anything thicker than 10mm as it is a thight fit as it is. The capacitors on the back of the display couldn't be in a more worse place . I don't think that even a 8mm fan would be a direct fit. You'd still have to tilt the display a bit.

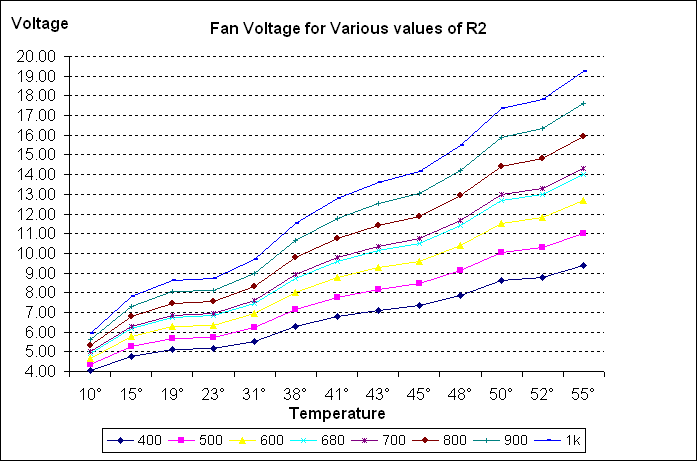
To lower the voltage at the fan, lower the value of R2. My initial plan was to use a 1K trimmer pot, but used a fixed resistor to keep it simple. The problem with a lower value for R2 is that it lowers the entire curve and doesn't make it steeper (on the contrary). If you want to make it steeper, you'd have to get a thermistor with a higher 'B' value (a measure of the thermistors sensitivity to changes in temperature, higher B values giving greater % changes in resistance). Downside is that the temperature will probably stabilize at a higher value too.
I have no idea of the B value of the thermistor I used. The place I got it from didn't even know about B values. They only labeled their thermistors by resistance.
I actually bought 3 thermistors, 220, 470 and 1K2 and they all gave very similar results (steepness of the curve). In the end I used the 470 because it was easier to install.
So you see, finding the right thermistor isn't easy either.

The fan turns off when the voltage goes under 5V. If you want to keep it inaudible, you'd need to keep the voltage at about 5-6V because the holes in the top lid create a lot of turbulence. The fan made a lot less noise when not attached to the lid.
If you would do that with the thermistor I used, you'd need to use a 400-500 ohm resistance for R2 (thanks for the graph Genixia), but than you'd never get 12V at the fan when you need it.

I have the player sitting at my desk while I'm typing this. With the fan turned off, it stabilized at 38°C. With the fan turned on, at 28°C. This is a very good result, but it isn't really necessary. The empeg is perfectly happy at 38°C so there's no need to have the fan go on. I might look for a thermistor with a higher B value, add a trimmer and do some more testing. In the mean time, I disable the fan when I take it in the house. Iit usually stays in the car so it's not really that big a deal for me.

I'll add this info to my installation page.

Frank

Top
#99066 - 13/06/2002 20:28 Re: Temp controlled fan installation finished [Re: f_devocht]
genixia
Carpal Tunnel

Registered: 08/02/2002
Posts: 3411
I'll add this info to my installation page.

Feel free to steal that graph
_________________________
Mk2a 60GB Blue. Serial 030102962 sig.mp3: File Format not Valid.

Top
#99067 - 13/06/2002 23:10 Re: Temp controlled fan installation finished [Re: f_devocht]
genixia
Carpal Tunnel

Registered: 08/02/2002
Posts: 3411
Hmm. 0.6W/12V = 50mA. There's more than a few Op Amps capable of drving that current directly, and that would open up a lot of possibilities wrt to Wheatstone'ing the thermister, and biasing the opposite leg of the bridge so that the fans doesn't start until after the bias has been balanced. You could get pretty aggressive with the gain then...
_________________________
Mk2a 60GB Blue. Serial 030102962 sig.mp3: File Format not Valid.

Top
#99068 - 14/06/2002 01:38 Re: Temp controlled fan installation finished [Re: genixia]
f_devocht
member

Registered: 28/12/2001
Posts: 159
Loc: Belgium
Thanks, I'll do just that

Good idea about the opamp. I might try that instead.

Frank

Top
#99069 - 16/06/2002 15:39 Re: Temp controlled fan installation finished [Re: f_devocht]
beaker
addict

Registered: 19/08/2000
Posts: 588
Loc: England
As it happens I've just finished my fan controller. I mentioned I was going to have a go at designing something after initially fitting my fan some time ago. I designed it and bought all the components several months ago but I've only just got around to actually soldering the components into a bit of Veroboard. My knowledge of electronics is very limited but it seems to work. It's sitting here on my desk at 32 deg C where it would normally be at about 43 deg C and I can't hear the fan unless I get my ear really close to it. I'll have to see how it goes in the car (where it would always top 55 deg C after about 1 1/2 hours driving.

The fan does increase in speed as the Thermistor gets hotter (tested by bringing soldering iron near to Thermistor) but I've yet to correlate temp against output voltage. I've attached a scan of my original circuit diagram and an Excel spreadsheet of all my calculations in case anyone's interested or wants to take my design and improve it. As you can see from the circuit diagram part of it didn't work so I removed it. That bit was supposed to keep the fan off until it reached about 6V.

I'll do some more experimentation & take a few measurements when I get time. Meanwhile someone with more electronics knowledge might like to improve it.

You may notice I've used a Wheatstone bridge and an Op-Amp (LM324 - quad) as mentioned in a couple of recent posts in this thread.


Attachments
98247-Fan_Controller.zip (40 downloads)

_________________________
Marcus 32 gig MKII (various colours) & 30gig MKIIa

Top
#99070 - 16/06/2002 15:50 Re: Temp controlled fan installation finished [Re: beaker]
mtempsch
pooh-bah

Registered: 02/06/2000
Posts: 1996
Loc: Gothenburg, Sweden
At the Amersfoort meet Patrick showed an empeg with the remote mount face, as well as video out - too cool! In order to keep things cool it has to have a fan. The one used was really slim and mounted to the lid with plastic rivets. IIRC he said it was from Farnell, you might want to ask him for an exact item number.

/Michael
_________________________
/Michael

Top
#99071 - 16/06/2002 16:01 Re: Temp controlled fan installation finished [Re: mtempsch]
BartDG
carpal tunnel

Registered: 20/05/2001
Posts: 2616
Loc: Bruges, Belgium
At the Amersfoort meet Patrick showed an empeg with the remote mount face, as well as video out

Wow! I sure hope somebody snapped some shots of that!
_________________________
Riocar 80gig S/N : 010101580 red
Riocar 80gig (010102106) - backup

Top
#99072 - 16/06/2002 16:08 Re: Temp controlled fan installation finished [Re: BartDG]
mtempsch
pooh-bah

Registered: 02/06/2000
Posts: 1996
Loc: Gothenburg, Sweden
They did... I expect pics to appear soon (didn't bring a camera myself this year :-( ), if they haven't already. Quite possible that piccie links are posted elsewhere on the BBS - amazing what a backlog you get from not reading the BBS in a couple of days...

Edit: It was also the third most expensive player existing (it has two brothers), and you shouldn't be holding your breath waiting for either feature to be available...

/Michael


Edited by mtempsch (16/06/2002 16:10)
_________________________
/Michael

Top
#99073 - 16/06/2002 16:13 Re: Temp controlled fan installation finished [Re: mtempsch]
BartDG
carpal tunnel

Registered: 20/05/2001
Posts: 2616
Loc: Bruges, Belgium
It was also the third most expensive player existing (it has two brothers), and you shouldn't be holding your breath waiting for either feature to be available...


Heh! Yeah, I thought as much already.

Still...it's nice to drool ! (for the right reasons )
_________________________
Riocar 80gig S/N : 010101580 red
Riocar 80gig (010102106) - backup

Top
#99074 - 16/06/2002 19:37 Re: Temp controlled fan installation finished [Re: beaker]
genixia
Carpal Tunnel

Registered: 08/02/2002
Posts: 3411
Hmm, I can't understand what you were trying to do with the 7805 in that circuit...theoretically your fan could only get 5V max..

LM324 has a 20mA Iout capability. Assuming you're using a similar spec fan to Frank, you could do a dirty hack to remove the need for a transistor/regulator. Use 1 of the OpAmps to do the detection as your circuit currently shows, and hook up the other 3 in parallel as a current driver to give you 60mA max driving current. (It's not the ideal way to do things but it should work.)
_________________________
Mk2a 60GB Blue. Serial 030102962 sig.mp3: File Format not Valid.

Top
#99075 - 17/06/2002 01:30 Re: Temp controlled fan installation finished [Re: f_devocht]
f_devocht
member

Registered: 28/12/2001
Posts: 159
Loc: Belgium
Just a quick update.
I replaced the resistor with a trimmer. At about 600 ohm it seems to quiet the fan done quiet a bit. Where it used to run 31°C on my desk, it now runs 33°C, so I might even lower it more.
I haven't yet had the chance to test it in the car (this morning it only got 41°C with the fan off). I'm hoping it'll be hotter on the way back home.


Frank

Top
#99076 - 17/06/2002 04:59 Re: Temp controlled fan installation finished [Re: genixia]
beaker
addict

Registered: 19/08/2000
Posts: 588
Loc: England
In reply to:

Hmm, I can't understand what you were trying to do with the 7805 in that circuit...theoretically your fan could only get 5V max..


You can use a fixed voltage regulator as an adjustable one by varying the voltage at the reference input just like you do with an adjustable one. It probably doesn't function as well as one which is has been designed to be adjustable but it works well enough for this application.

The Transistor was supposed to remain off until it's Gate voltage had reached a certain value (650mV I think) and then turn the fan on. This would prevent the situation where the fan isn't quite getting enough voltage to start it properly and it sits there oscillating back and forth.

Using the remaining Op-Amps in parallel as a current driver sounds like a good idea and is something I hadn't thought of. I'll look into that. Thanks for the tip .
_________________________
Marcus 32 gig MKII (various colours) & 30gig MKIIa

Top
#99077 - 17/06/2002 16:14 Re: Temp controlled fan installation finished [Re: beaker]
beaker
addict

Registered: 19/08/2000
Posts: 588
Loc: England
Small update:
Here's a graph of Fan RPM v Temp. I intend to do a bit more measuring and experimentation but all seems hunky dory at the moment.


Attachments
98444-RPMvsTemp.jpg (153 downloads)

_________________________
Marcus 32 gig MKII (various colours) & 30gig MKIIa

Top
#99078 - 18/06/2002 06:09 Re: Temp controlled fan installation finished [Re: beaker]
tman
carpal tunnel

Registered: 24/12/2001
Posts: 5528
[being_stupid]Okay. I might be really stupid and not quite seeing it but why does the temperature increase when the fan RPM increases?[/being_stupid]

[edit]Okay. I've realised now that it must be showing the action of the thermistor as well

- Trevor


Edited by tman (18/06/2002 06:10)

Top
#99079 - 18/06/2002 06:10 Re: Temp controlled fan installation finished [Re: f_devocht]
jem7784
stranger

Registered: 10/06/2002
Posts: 35
I left the player in my car yesterday (thinking it was only 80 F outside and would be OK) but when I got to the car and started driving, it hit the 55C treshold almost instantly and then peaked at 60C before I pulled the unit out of the dash to cool it off in an open air environment... Well, I live in the midwest US and it's ALWAYS hot in the summer and my car interior is black - not a good combination. So I set about to just wire the fan directly last night... And it does work perfectly. The only thing is that the way I have it wired, it's always on - even when the car is off. I KNOW what I did "wrong" (wired it direct to power rather than to the keyed power.

My question is: in the circuit that is described in this thread and web page, you used that pin on the circuit board... Does that have power all the time or is it "keyed"? Meaning, in the car, does it have power only when the ignition key is on or does it always have power?

BTW... on my drive into work today with the fan going full speed (my fan is actually one from a Cyrix 150 CPU and is about 14 mm tall and don't seem to have any issues), I couldn't hear it under normal driving conditions with only a slight whine at slower speeds/RPM's... And I maxed out at 28C with an ambient temp of about 72F (Sorry for mixing my C's and F's... I can't do the conversion in my head)

Jim

Top
#99080 - 18/06/2002 09:31 Re: Temp controlled fan installation finished [Re: tman]
beaker
addict

Registered: 19/08/2000
Posts: 588
Loc: England
OK, what it's showing is that as temperature increases so does the fan RPM. This means that the hotter it is the more the fan will cool the player. When I ran the test I covered up the vent holes so that the temp would climb nicely and whenever the temp indicated by Hijack (thanks Mark ) increased by another degree C I would take a reading of fan RPM. This at least proved to me that the circuit worked over the kind of temperature range that I need. I'd like to do some tests over a larger temp range and see if I can increase the rate of change of fan speed against temperature. It seems to work very well but it's early days and I still need to take it on a longish run to see how it performs in the car.

Hope this clarifies things a bit .
_________________________
Marcus 32 gig MKII (various colours) & 30gig MKIIa

Top
Page 1 of 2 1 2 >